March Madness

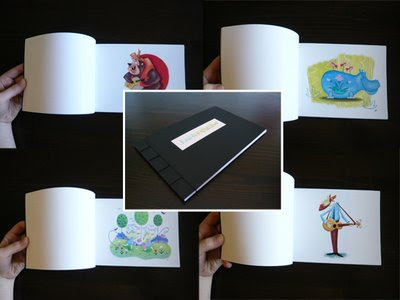
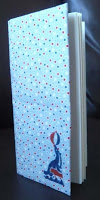
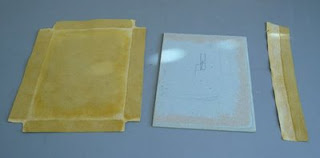
It has been a busy few weeks and I have a few photos of my recent projects to share. Above is a Japanese stab portfolio that I made for Josh. He needed a portfolio that would look professional, and could be made quickly. Japanese 4-hole bindings are a good fit for that criteria. The only downside to these books is that they don't open as well as some other bindings. To compensate for that, I suggested that he use a very large gutter. As can be seen in the image above, thanks to that large gutter, all of J's artwork can be seen without forcing the book to lie flat.

Speaking of Japanese bindings, my friends, Hannah and Clint came to visit recently and were up for a little how-to lesson in the bindery!
Here they are posing with their joint creation. They did a great job from start to finish! I showed them how to use Heat'n'Bond to iron fabric onto the light weight cover boards. Then we experimented with some screen printing for the front cover using one of Josh's screens. That part was especially fun because it was my first try with the technique. I was a little bit worried about the ink sticking to the screen. We made several prints in rapid succession and then raced to the tub to wash the ink out! It all came out and the screen is ready to use again! Han and Clint took turns punching holes in the covers and the pages and then Han sewed the book together. Job well done.

I'm teaming up with fellow NBSS alum, Wendy Withrow of Windy Weather Bindery, for a production project. My dad, who is currently the president of a professional association (to be named later!), is the client. As he is nearing the end of his presidency he would like to offer a book as a token of thanks to the members of the board. Lined pages were the preference, so, instead of trying to line pages myself, I ordered pre-sewn text blocks from Hollander's. That little step ended up saving time and money.

Last week I made all of the covers for the books. The USPS got them up to Michigan in record time. Wendy will be working on stamping the names of the members as well as the association name onto the covers. When she's done, she'll send them back, I'll case them in, and then send them to Texas where an annual conference is taking place.

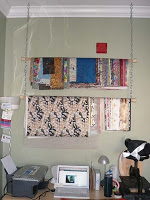
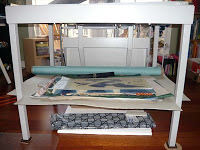
Spring into Handmade was the name of the arts and craft market that Cottage Industry, of Orlando, hosted this past weekend. I shared a table (photo above) with my friends, Sarah and Lisa, from Orange Blossom Ink. Visit their website here to read more about our experience at the market and here to read about a field trip they took to Cottage Industry last year.

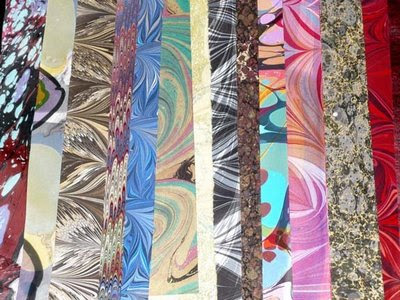
The three of us decided that we should collaborate on an item to sell at our table and settled on boxed card sets. Orange Blossom Ink designed cards and lined envelopes with decorative paper that Lisa found at Paper Source on a recent trip to Chicago. I used the same decorative paper along with some Japanese Asahi cloth to make the boxes. We made two sets for the show. Here is a photo of the other set. Each box houses eight cards with four different prints. I imagine that we will collaborate again in the future and that a person might be able to find one or two of these sets listed in our respective Etsy shops!

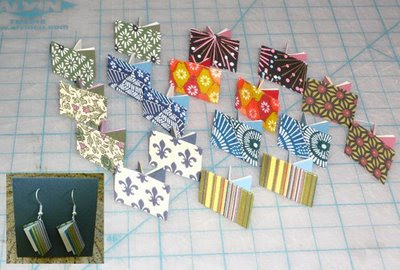
Below are a number of my miniature book earrings in progress. They turned out to be my number one seller at the market. Definitely fun to make! They are all pamphlet bound, and just as much work went into each tiny book as would go into a larger pamphlet binding. It was satisfying finding just the right size papers in my collection of smaller pieces.

So now, the March madness continues! I have an interesting and complicated box project to work on today, as well as some book repairs that are nearly complete. The two books I'm repairing are eager to return to their home in Massachusetts! I've been updating my Boombox Bindery Facebook Page with photos of the new work I'm adding to Etsy. I have a few more things in the store and will continue to add to it, little by little.

Boom Box Bindery


Boom Box Bindery is underway! In January I signed up as a seller on Etsy.com. Yesterday Josh did a bang up job on the Boom Box logo and today I posted my first item. For about three years now, I've been mulling over what the name of my bindery should be. Boom Box Bindery came to mind during some brainstorming this past September and it has had some staying power. The product focus of the store will be books, boxes and cards.


As can be seen in BBB's first posted item, Josh and I will be collaborating a bit. He did the screen printing on this book. I came up with the idea for these little books when I was thinking of a shower gift for two of our friends who are getting married next month. They will be getting the two books pictured in the middle ground of the photo below. One of them has the same cover, with the word "lists" on it, while the other has the word "ideas" printed on it. Josh and I have written down many lists and ideas in our few months of marriage, and I thought it would be nice for our friends to have official books for this purpose that are easy to keep handy because of their size.


One of the many neat features on Etsy can be found under the "Custom" tab on the navigation bar. This brings the craft shopping patron to "Alchemy," a spot where they can request custom items. The requests come in varied specificity. You'll find a post in which someone is just dying to have the very same brown sweatshirt as so-and- so in such-and-such a movie, next to a post for a general gift for grandma. I have put a few bids on projects for those people looking specifically for books or boxes. I also bid on projects that are vague, where people describe the person they are trying to find something for, and request any and all suggestions. Most of these have upwards of 20 bids on them, so I'm looking at my bid writing as an opportunity to gain some experience interacting with clients.

Now that my online selling presence is somewhat of a reality, I am increasingly excited to make new work and get selling! In addition to working on items to sell on Etsy, one of my new goals is to join Orange Blossom Ink in sharing a table at the upcoming arts and crafts show to be held at Cottage Industry. I heard that there was going to be a Sailboat consignment event going on across the street on that day and decided I'd try to work some nautical themes into one or two items. When I actually read about the event I realized it is Sale Boat rather than Sail which turns out to be upscale children's consignment... so children's themes it is!

Paper Storage

Several Years ago when I was meandering the wooden walkways of Gilman Village in Issaquah, Washington, I noticed a contented woman sitting on a bench in the sun enjoying a snack. It took merely a second for me to memorize that comfortable picture, and what happened next is why I still remember it. I glanced to my right and saw an open door and a sign that read "The Paper Fix." Always having been a fan of paper, it was only natural to walk inside.

The Paper Fix turned out to be a shop with a balanced offering of decorative papers, fine stationary, and custom gift wrapping. Those are three things that I thoroughly enjoy. As I was taking in my surroundings, the woman from the bench came inside. It turned out that she was Angela Fix, owner of The Paper Fix. I had a great time talking to her and learning about her business. Seeing what she did for a living and how content she was, gave me a little glimpse of something I might like to do in the future. We enjoyed the same things.
Cutting, folding, tying, gluing. At the time I thought, someday I'd like to be surrounded by beautiful paper, just like this. Happily those likes of mine led me to bookbinding, and voilà, I'm on my way to being surrounded!

The paper shown above is a piece purchased from The Paper Fix. The papers were displayed hanging on wooden rods that were suspended from the ceiling using heavy chains. From what I remember the rods just slipped through the large eyes of the chains.

I have a small collection of papers that I like to have at the ready, and at this time, my bindery lacks a good spot for flat files. After telling my husband, Josh, the story above, he set to work recreating similar paper storage for me. I think his variation on the theme might be a bit sturdier than the original.
Instead of threading the rod through the eyes of the chains, he screwed eye hooks into the rods so that they could accept S hooks which could then be attached to a length of chain. The eye hooks are also what hold the contraption to the ceiling. His final step was to add rubber feet to the ends of the rods. I thought that was a nice finishing touch. Below are close-ups of the attachments.


There are some pros and cons to storing paper this way. The major pro is that a lot of color is instantly added to the bindery. Also, because of the way I've arranged the papers, with a little sliver of each showing, I am able to take stock of what I have and readily select the paper I'd like to use. I don't have to sort through a drawer of papers stacked on top of each other.

After a few hours hanging on a rod, the paper is trained to have a little bend in the center. Luckily it is easily trained to do the reverse. Surely, the actual hanging on the rods must not be a major issue considering how many stores use a similar hanging method.
A possible con is light damage that may occur. The paper is located on the wall furthest from the bindery windows, but I think there is a fair chance that if I don't plow through these papers, those slivers will be discolored in a few months. Time will tell.


For now, I'm pleased that my decorative paper is out of tube storage and off of the floor where it was stored between pieces of binders board. The rest of my paper has a different story. I store cut pieces on shelves of my desk, and other pieces on a shelf made out of binders board, that is fitted to my Kutrimmer. This shelf holds large plain sheets, decorative papers that aren't quite the right size to hang, as well as rolls of bookcloth.

Sadly, The Paper Fix is no longer in Gilman Village. I'm not sure if the store moved, or if it closed. Hopefully Ms. Fix still has beautiful paper in her life, and is just as content as the first day I saw her.

Fabric Wrapper Covers

Pictured above are a few Christmas gifts that I made this year. They are pamphlet sewn books with fabric covers. A notebook to jot down grocery lists, music, or general to-do lists were the end-uses I had in mind for these checkbook sized books. They were each wrapped with an extra set of pages. The cover is secure, but easy to remove when it is time to replace the pages.

I made this diagram to demonstrate the 3-hole pamphlet stitch and the folding process of the cover. Click on any of these images to get a larger view. I've made many of these covers using paper, and discovered a few differences should be employed when using cloth. As in the paper version, sewing and adhesives are unnecessary. It is necessary, however, to use a hot iron, rather than a bone folder to make creases. The dotted line on the left and the right indicate the first fold which is unique to this fabric version. I found that it made for a cleaner look to have a folded edge on the inside of the wrapper. In the future I might introduce thread to the wrapper by serging or hemming that inside edge.

Here are standing versions of the book, so you can peek inside and see how the wrapper extends all the way inside to the valley of the folds.

The image of the seal on the book to the left (and below) was transferred onto the cloth using a Vogart hot iron transfer pattern. I have an assortment of these and have had luck finding them at antique stores and garage sales. I've also come across some on etsy.com.

In its original form, the image looks like a layer of acrylic painted on very thin parchment paper. The side with the pigment is placed directly on the surface of cloth or paper. Use a hot iron on the back of the parchment paper until the pigment is transferred to the new surface and the parchment readily peels away from the newly pigmented cloth or paper. If heat is not applied long enough, bits of the parchment will remain. The image will still transfer, but it can be rather time consuming to pick off the little bits of paper! Just test the corner of the parchment before you pull it off completely.

Water

This is my entry for the 2009 Designer Bookbinders International Competition. I completed it this past August and sent it over to Oxford in November. Confirmation was received that it made it to England in one piece, and now it's time to sit back and wait for the judging, which will take place in January.

I was trained in the English tradition at North Bennet Street School by Mark Andersson and Jeff Altepeter. While studying at the Uppsala University Library Bindery I was able to learn about the French tradition from Adam Larsson.

Tradition calls for sawn in cords, but we decided it would be nice if this book actually opened, so it is sewn in more of an English style on separated cord, flat against the spine.


Graphite top edge. From some angles looks like a regular graphite edge, and from other angles shows the wave pattern made with my thumb that mimics the theme and pattern on the book.

Beveled Boards and Paring to match. I tried everything out on multiple plaquettes before the real deal!

As one can see in the paring example above, the corners are very interesting. Two turn-ins come together and meet at a bevel while the little tab at the corner comes up over the board and is pleated on top of the previously met turn-ins. Make sense? After all that, pare a piece of matching leather to less than zero and paste it on top of it all! The listile can also be seen in this image.

This is where I stood during gold tooling. I had everything I needed at my finger tips. My wave pattern was made up of four different gouges that I used at steady intervals. I really enjoyed having all of my tools hot at the same time. It made for a smooth work time, not having to stop and re-heat each tool. There wasn't any vaseline available to put on my cotton for picking up the gold, so I just used the oil from my forehead and have decided that I prefer it. Authentic, one might say. The oil is lighter than the vaseline, which just seems appropriate when dealing with delicate gold leaf.

Gold Tooled Listile. This can have many variations. Multiple tooled lines, or different materials for the central portion. I used a Swedish marbled paper from the Uppsala collection. Suede, or leather is often used in that area. There is a natural recess in the central area because of the full thickness turn-ins. I folded the marbled paper around a card (about 20pt or so) and adhered it on the back side. I think that the leather border is technically the listile regardless of what is contained in the central portion. Creating the border with ultra-thin leather and then tooling it (blind and gold) was my favorite part of this binding. This image shows the side closest to the spine and how the fourth side is added and adhered to the end sheet.

I experimented quite a bit and came up with a fun new technique. I wanted to incorporate a glassy sheen on the cover somehow. I cut out my letter-forms from the leather after covering and tooling the book. I cut matching shapes out of the same marbled paper used on the interior. The marbled paper was glued into place with PVA. Initially I thought that epoxy would be the perfect thing for my glassy sheen, however, it dried with a milky finish. PVA achieved the desired result, but over time I knew that its reaction to pressure and temperature might prove fatal for the binding. Bosse Carlsson recommended super glue, the main ingredient in super glue is acrylic resin, that sounded promising, and it was! The final result was achieved by applying a layer of PVA with a top sealing coat of acrylic resin.

A total of 500 sets of sheets were printed. I'm not sure how many entrants there were in total, but 125 of the books will be displayed at the Bodleian Library with their "1000 Years of Bookbinding" exhibition and will then be part of a traveling exhibition to the states. I've seen Adam's entry and am looking forward to seeing John Nove's. I'm not sure if I know any of the other binders who have entered, but I'm definitely glad that the entry fee includes a catalog! I can't wait to see all of them.